

Burr Grinder Cleaning and Calibration: Deep Clean and Re-Zero
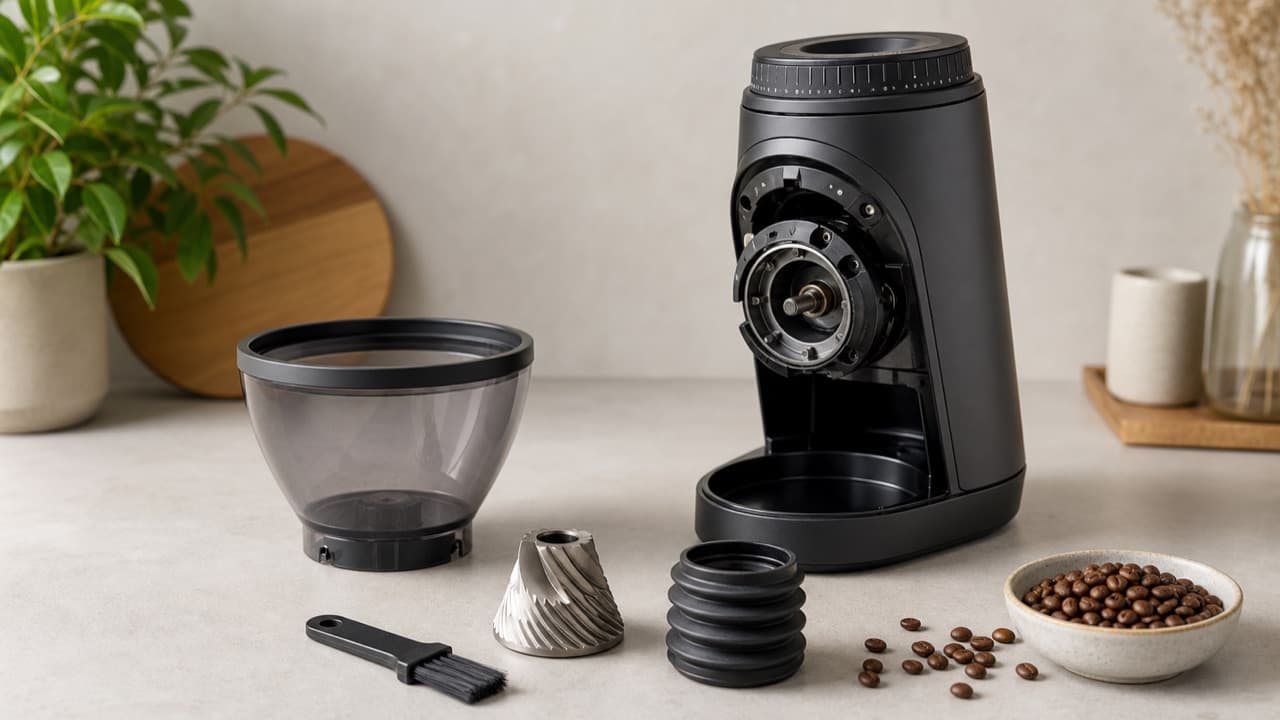
Burr grinder cleaning is only half the job; the other half is putting the burrs back so your grind settings mean what they did before. A proper deep clean means removing the upper burr, brushing out the teeth and the exit chute, wiping away old oils, then re-finding the zero point and checking the grind before you trust your old numbers. This guide is for home espresso and pour-over drinkers whose coffee has started tasting stale or bitter, or whose dial setting no longer gives the same result after cleaning.
If you just want the basics for blade and burr grinders, start with our general guide on how to clean a coffee grinder without damaging it. This article goes deeper into the burr set itself: disassembly, calibration, alignment and wear.
Key takeaways
- Note or photograph your grind setting and the burr carrier’s position before taking anything apart.
- Keep water off steel burrs and motor parts unless the manual explicitly allows it; dry tools are enough for routine burr cleaning.
- Most flavor problems come from oily fines packed in the exit chute and around the burr carrier, not from the burr faces themselves.
- Re-find zero after every deep clean. A grain of coffee under a burr or a carrier seated one thread off shifts every setting.
- If you have to keep grinding finer to get the same espresso shot time, and cleaning doesn’t fix it, your burrs may be wearing.
Why burr grinders need a deeper clean
Burrs crush beans between two cutting surfaces, producing a range of particle sizes that includes very fine dust. Those fines, along with the oils released from roasted coffee, cling to the burr teeth, the chute and the walls of the grind chamber. Over days and weeks the oils oxidize and taste rancid, and packed fines can partly block the exit, changing how coffee flows out and adding to grind retention, the coffee left inside after each dose.
Dark, shiny roasts leave much more oil than light roasts, and flavored beans leave residue that carries into the next bag. Static also traps fines on plastic parts, which is why the inside of a grinder can look clean while the chute is packed.
How often to deep clean a burr grinder
| How you use it | Quick clean (brush hopper area and chute) | Deep clean (remove upper burr) |
|---|---|---|
| Daily espresso, medium or light roasts | Weekly | About monthly |
| Daily espresso, dark or oily roasts | Every few days | Every two to four weeks |
| Daily filter or pour-over | Weekly to fortnightly | Every one to two months |
| Occasional use, a few times a week | When switching beans | Every two to three months |
| After flavored beans | Immediately | Before going back to unflavored coffee |
These are practical starting points, not rules. If your grinder’s manual gives an interval, follow it, and clean sooner if coffee starts tasting flat or bitter for no other reason.
Step-by-step burr grinder deep clean
- Unplug it and empty it. Remove the beans from the hopper, run the grinder empty for a few seconds to clear the chamber, then unplug it. Never put fingers or tools near the burrs while the grinder can start.
- Record your setting. Write down the dial number or click count. On many electric grinders, also note where the adjustment ring or burr carrier lines up with a mark on the body; a dot of removable tape works well.
- Remove the hopper and upper burr. Follow the manual. On many conical models the upper burr lifts out on a carrier; on many flat-burr models the adjustment collar unscrews. On hand grinders, you usually remove the adjustment nut, then the inner burr and its shaft. Lay parts out in order on a towel.
- Brush the burrs along the teeth. Use a stiff nylon brush and brush in the direction of the cutting grooves. Avoid metal picks against cutting edges; a wooden toothpick is fine for stubborn grounds.
- Clear the chute and chamber. Use a narrow brush, pipe cleaner or a small vacuum nozzle to clear the exit chute and the area under the lower burr. This is where packed fines live.
- Remove oils. Wipe burrs with a dry microfiber cloth. Wash only removable plastic parts such as the hopper and catch cup in warm, soapy water, and dry them completely.
- Check the threads and seats. Brush coffee out of the adjustment threads and the surface where the burr carrier sits. A single trapped grain here throws off calibration.
- Reassemble carefully in the reverse order, turning the carrier gently until it seats. Don’t force anything.
What about grinder cleaning tablets and rice?
Purpose-made grinder cleaning tablets are designed to be ground like coffee and absorb oils from the burrs and chute. They’re a useful in-between step, but they don’t replace removing the upper burr. Run them at a medium setting as directed, then grind a small amount of coffee to purge residue. Uncooked rice is often suggested online but is harder than coffee, can strain motors and leaves starchy dust; several grinder makers advise against it.
How to calibrate a burr grinder after cleaning
Calibration here means re-establishing a reliable reference point so the numbers on your dial mean the same thing as before.
Finding zero
Zero is the point where the burrs just touch. On most hand grinders, including clicking designs such as the Timemore Chestnut C2, you turn the adjustment fully in the fine direction until the handle no longer turns freely, then count clicks back out. Do this gently; cranking the burrs together can damage edges.
Electric grinders vary. Some manuals tell you to find zero with the motor off by turning finer until you feel resistance; others describe a short, careful check with the motor running. Follow your manual exactly, because running hardened burrs into each other can chip them. For an electric model such as the Starseeker E55, check the manual or product page for the recommended adjustment and cleaning procedure.
Re-dialing your recipes
Once you have zero, return to your recorded setting and grind a test dose. For espresso, pull a shot with your usual dose and yield and compare the time; if it runs noticeably faster or slower than before, adjust and note the new setting. Our espresso grinder dial-in guide walks through dose, time and taste, and a scale with a built-in timer makes this repeatable (see our coffee scale accuracy and timing guide).
Keep a small note of “clicks from zero” or “dial number” per brew method. Those numbers are specific to your grinder and beans, so treat online settings as a starting point, not a target.
Checking burr alignment and wear
Signs of misalignment
If the grind looks inconsistent after reassembly, with lots of dust and large chunks together, or the burrs rub on one side before touching all around, the carrier may not be seated properly or debris may be trapped under a burr. Disassemble, clean the seating surfaces and reassemble. Some flat-burr enthusiasts mark the burr faces with a felt-tip pen and turn them by hand at a very fine setting to see where the ink wears; uneven wear suggests poor alignment. That’s an advanced check, and adjusting alignment with shims is best left to people comfortable with their specific grinder.
When to replace burrs
Burr life depends on burr material and size, the roast you use and how much you grind. Manufacturers usually state an expected life, often in pounds or kilograms of coffee, and for home use that’s typically a long time. Signs of wear include:
- needing to grind progressively finer for the same espresso shot time, even after cleaning;
- slower grinding or the motor laboring more;
- visibly rounded, chipped or shiny-dull cutting edges;
- more uneven grounds that cleaning doesn’t fix.
Ceramic burrs resist dulling but can chip if a small stone sneaks in with the beans. Steel burrs dull gradually but tolerate knocks better. Buy replacement burrs from the manufacturer or a confirmed-compatible source.
Mistakes to avoid
- Taking it apart without recording the setting. You’ll spend the next week re-dialing by taste.
- Rinsing steel burrs and reassembling them damp. Moisture causes rust spots on edges and makes fines cake even harder.
- Cleaning the burr faces but not the chute. The packed chute is where stale coffee and retention build up.
- Forcing the burrs together to find zero. Gentle contact is enough; force can chip or blunt the cutting edges.
- Losing the small parts. Springs, washers and shims are easy to drop. Lay them out in order on a towel.
- Judging the first shot after cleaning. Grind a small purge dose first to clear tablet residue and reseat the flow.
Which cleaning routine fits your grinder
- Hand grinder owners: brush after each session, deep clean when changing beans or monthly, and count clicks from zero every time you reassemble. Our manual coffee grinder buying guide covers adjustment systems.
- Electric espresso grinder owners: clean the chute weekly, use tablets between deep cleans if you like, and recheck zero and shot time after every disassembly.
- Filter-only brewers: a monthly or bimonthly deep clean is usually enough; focus on removing oils if you favor darker roasts.
For more brewing gear and accessories, browse the home and kitchen category.
Frequently asked questions
Can I wash burr grinder burrs with water?
Only if the manufacturer says so. Most recommend dry cleaning with a brush and cloth, because steel burrs can rust and moisture makes fines stick. If you do wash removable burrs, dry them completely before reassembling.
Why does my grinder setting change after cleaning?
The burr carrier may have reseated slightly differently, or grounds trapped in the threads or under a burr have shifted its position. Re-find zero, then return to your recorded setting and check with a test dose.
Do grinder cleaning tablets really work?
They help absorb oils and push out old grounds between deep cleans. They don’t clear packed chutes or replace removing the burrs, so treat them as maintenance, not a full clean.
How do I know if my grinder burrs are dull?
Common signs are needing to grind finer and finer for the same result, slower grinding and more uneven particles that don’t improve after cleaning. Compare against the manufacturer’s stated burr life and inspect the cutting edges.
Is it safe to run a burr grinder empty?
Briefly running it empty to clear grounds is normal for many electric grinders. Running it empty at the finest setting, where the burrs can touch, is not; follow the manual’s guidance on finding zero.
Shop Home & Kitchen
View all →
3-Tier Over-Toilet Storage Rack in Powder-Coated Carbon Steel
In stock · Options available · Ships in 7–21 business days
 Sale
Wingback Massage Recliner Chair in PU Leather with Footrest
In stock · Options available · Ships in 7–21 business days
 Sale
Mid-Century Modern Accent Armchairs, Set of Two, Wood Frame
In stock · Options available · Ships in 7–21 business days

Fireplace Flame Ultrasonic Humidifier and Oil Diffuser
In stock · Options available · Ships in 7–21 business days
Continue reading
 Home & Kitchen
Manual Coffee Grinder Buying Guide: Burrs, Steps, Speed
Manual coffee grinder buying guide: compare burr size and material, stepped vs stepless adjustment, bearings, capacity and grind effort for your brew.
 Home & Kitchen
Coffee Scale Accuracy: Response Time, Timers and Calibration
Coffee scale accuracy explained: resolution vs true accuracy, response lag, auto-start timers, and how to check and calibrate your scale at home.
 Home & Kitchen
How to Clean an Essential Oil Diffuser Step by Step
How to clean an essential oil diffuser: weekly vinegar descaling, safe care for the ultrasonic plate, nebulizer cleaning, and daily habits that stop residue.